
Which crumb size really makes your chicken crispy or your meatballs hold together better? Choosing between coarse and fine bread crumbs can change texture, flavor, and cooking time in ways you might not expect.
You can make perfect crumbs at home in minutes using a food processor or by toasting stale bread on a sheet in the oven.
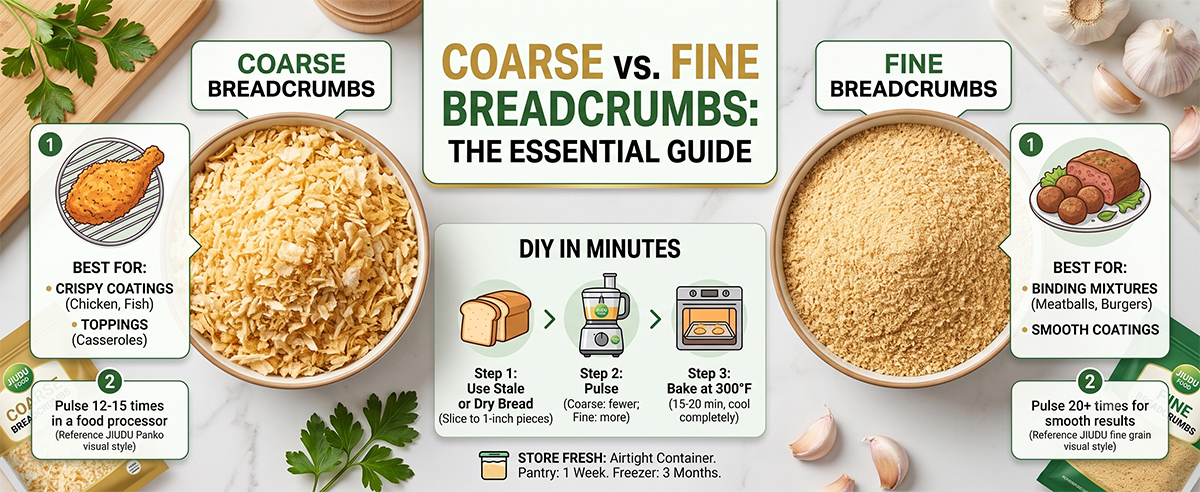
Fresh bread works great when you want a soft, tender coating. Dry or stale bread gives crunch after baking and lasts longer in an airtight container — up to one week in the pantry or three months in the freezer.
Adjust oven time and temperature to tweak flavor and texture, add seasoning like garlic, salt, or a teaspoon of sugar, and grind to the size your recipe calls for.
The grind of your crumbs defines how a coating crisps and how a mixture binds.
Professional cooks use breadcrumbs to add texture and structure to everyday recipes. A coarse grind gives a crunchy crust. A fine grind helps mixtures stick together and creates a smooth finish.
Why size matters: You can bind meatballs and meatloaf with fine bread crumbs. Coarse crumbs crisp fried chicken. Homemade crumbs also reduce waste and turn stale bread into something useful.
The loaf you pick sets the stage for texture and flavor in every crumb.
Choosing the right loaf: For a tangy profile, use sourdough. A crusty sourdough gives crunch and bold flavor for toppings. Soft sandwich bread yields finer, denser crumbs that work well as a binder in meatballs or loaves.
Handling stale bread: Leftover bread or stale bread dries faster in the oven and grinds more evenly in your processor. If you have about 4 cups of bread cubes, process them to a uniform size before toasting for even browning.
Remove the crust from sandwich bread for a uniform color and finer texture. For richer crumbs, keep a little crust or a touch of baking fat in the mix to add flavor and structure.
Small, consistent bread pieces are the secret to a predictable crumb texture.
Start by cutting the loaf into 1-inch pieces. This size helps the blades break the loaf down quickly and evenly in your food processor.
Whether you use fresh bread or stale bread, the same rule applies: small pieces give a consistent grind. Tear or slice the sandwich bread into uniform chunks so the processor can work without clumping.
For a lighter, uniform color, remove the crust from sourdough or sandwich bread before processing. Many cooks prefer this when making pale bread crumbs for coatings and toppings.
Using leftover bread from sandwiches or meals is efficient and reduces waste. By preparing similar-sized pieces, you set up the structure the bread food processor needs to produce perfect crumbs for your recipe.
Control of pulse counts gives you a reliable texture every time.
Start with even bread pieces and a clean processor bowl. For coarse crumbs, pulse the food processor 12 to 15 times. This yields pieces no larger than about 1/4 inch and keeps a rustic crunch ideal for toppings or fried coatings.
For fine bread crumbs, pulse 20+ times. That extra work produces a delicate texture that clings to cutlets and helps thicken mixtures. Stop and check after every few pulses to avoid turning crumbs into powder.
Season lightly with a teaspoon of salt or other seasoning before toasting in the oven, if your food plan calls for it. With practice, you’ll hit the right size and texture in minutes for any bread-based task.
A food processor turns day-old loaves into uniform crumbs in just a few quick pulses.
Cut about 8 ounces of bread into 1-inch pieces and add them to the bowl. Pulse the bread in short bursts to control the final size.
Work in short bursts: stop and check the texture every handful of pulses. For coarse bread crumbs, pulse fewer times. For a finer crumb, process a little longer.
This method beats manual chopping because the processor creates a consistent texture that is hard to match by hand. Once you learn how to make bread crumbs, you’ll use up extra bread and save money on store-bought mixes.
A gentle oven turns moist bread into reliable, shelf-stable crumbs.
Set the temperature to 300°F. This low heat removes moisture without burning the pieces. It keeps flavor intact and protects delicate color during baking.
Spread the bread in a single layer on a rimmed baking sheet. Use a rimmed baking sheet so the pieces stay put while you stir. A single layer promotes even airflow and steady drying.
For coarse pieces, bake 17 to 20 minutes. Stir once, about halfway, to shift hot spots.
For fine crumbs, bake 15 to 18 minutes until fully dried and lightly toasted. Check every few minutes near the end so you reach the right texture.
Stirring halfway prevents dark edges and gives uniform color across the sheet. Let the pieces cool completely on the baking sheet; cooling finishes crisping and stops carryover baking.
| Grind | Oven Temp | Minutes | Key Tip |
| Coarse | 300°F | 17–20 | Stir once; use a rimmed baking sheet |
| Fine | 300°F | 15–18 | Watch closely near the end for light toasting |
| Mixed/Toast | 300°F | 16–19 | Single layer on sheet; cool before storing |
Why this matters: Proper drying gives you a consistent texture for frying, topping, or binding. After cooling, store your bread crumbs in an airtight jar for crisp, shelf-stable results.
Seasoning your crumbs lets you control flavor without changing the core recipe.
Start simple: toss 1 cup of bread crumbs with a tablespoon of olive oil and a pinch of salt to create a base. From there, customize the mix to match the dish.
For a savory boost, add 1 teaspoon garlic powder and 1/2 teaspoon onion powder before you toast the crumbs in the oven. Always taste a small pinch after baking to check the salt-and-spice balance.
For an Italian profile, blend in dried oregano or basil and a tablespoon of grated pecorino. A little lemon zest brightens rich recipes without adding fat.
"Seasoned crumbs are the quiet ingredient that can make a simple dish sing."
Use high-quality ingredients for a gourmet finish. Small seasoning changes deliver big improvements in flavor and texture.
| Use | Seasoning | Before/After Oven |
| Binder (meatballs) | 1 tsp garlic powder, salt | Mix before |
| Topping (casserole) | Olive oil, oregano, pecorino | Toast in the oven |
| Frying coating | Lemon zest, salt, pepper | Mix before frying |
How you seal and chill your crumbs determines their shelf life and texture.
Keep them dry and cool. After baking, let your bread crumbs cool completely on a rack. Warm pieces trap steam and cause condensation once sealed.
Store crumbs in an airtight container at room temperature for up to one week. This prevents humidity from making the crumbs soggy.
To keep them longer, freeze the container for up to 3 months. Label the jar with the date so you know when to use them.
When you make bread, saving extra crumbs this way means you always have a crunchy topping or binder on hand. Treat stored crumbs gently, and they will stay fresh and ready for any recipe.
One smart way to use extra crumbs is to make a seasoned topping that toasts in minutes.
Sprinkle over pasta: Mix a cup of breadcrumbs with a teaspoon of garlic powder and a drizzle of olive oil. Toast on a baking sheet in the oven until golden. Toss over creamy pasta for crunch and extra flavor.
Coat and fry chicken: Use coarse crumbs to coat cutlets for a crisp crust. Press crumbs firmly so they adhere, then pan-fry or bake at the right temperature for a crunchy finish.
Boost meatballs and casseroles: Stir in a measured cup of crumbs to help bind and add texture. Or layer seasoned breadcrumbs over the vegetables and bake until the top is crisp.
| Use | Amount | Seasoning | Finish |
| Pasta topping | 1 cup | Garlic powder, salt | Toast 8–10 minutes |
| Chicken coating | 2 cups | Pepper, lemon zest | Fry or bake until golden |
| Meatballs | 1/2 cup | Teaspoon garlic, parsley | Mix into the meat before shaping |
Making crumbs at home saves money and gives you control over texture and flavor. You can tailor grind size, add a pinch of seasoning or a teaspoon of garlic powder, and match results to each recipe you cook.
Store finished crumbs properly: let them cool completely, then seal them in an airtight container or a small container for short-term use. Frozen, they keep well for months and stay ready when you need a crunchy topping or binder.
Practice the pulse counts and drying tips here, and you’ll confidently make bread that turns leftovers into better meals. Experiment with breads and blends to find the profile you love.


Hello, I am the online customer service


